 |
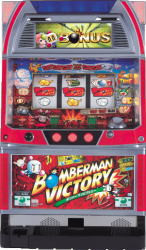
サミー
5号機 |
|
| 基本スペック |
役構成
 |
BIG BONUS |
 |
 |
REG BONUS |
  |
2枚 |
 |
 |
 |
5枚 |
 |
9枚 |
 |
リプレイ |
ボーナス出現率
| 設定 |
BIG |
REG |
PAYOUT |
| 1 |
1/474.9 |
1/1724.6 |
95.9% |
| 2 |
1/445.8 |
97.8% |
| 3 |
1/414.8 |
101.1% |
| 4 |
1/376.6 |
105.0% |
| 5 |
1/360.1 |
110.1% |
| 6 |
1/327.7 |
115.9% |
小役確率
通常時
BIG中
|
| 詳細 |
ボンバーマンビクトリーの特徴
本機ボンバーマンビクトリーは、流行ったゲーム「ボンバーマン」とのタイアップ機。
ボーナスは2種類のBIG(内容は同じ)とREGが存在し、ボーナス後に突入するボンバータイムとボンバータイム中のボムをナビしてくれるステップナビという2種類の機能も搭載されている。
ボンバータイムは3種類あるいずれかのボムが入賞すると終了するのだがボム成立時にステップナビが発生するとボムの種類をナビしてくれる為、ナビされたボムを避けることでボンバータイムが継続するという仕組みだ。 |
|
| 小役+ボーナス同時抽選 |
ボーナスとの同時抽選が行われている小役はスイカと3種類のボム。
スイカとの同時抽選にのみ設定差が設けられており、偶数設定の方が同時成立しやすくなっている。 |
同時抽選が存在する役
ボーナス単独抽選
| |
|
|
|
| 設定1 |
1/6553.60 |
1/1820.44 |
1/32768.00 |
| 設定2 |
1/5461.33 |
1/1985.94 |
| 設定3 |
1/4096.00 |
1/1310.72 |
| 設定4 |
1/3276.80 |
1/1365.33 |
| 設定5 |
1/2730.67 |
1/1057.03 |
| 設定6 |
1/2184.53 |
1/1213.63 |
+ ボーナス同時抽選
| |
|
|
|
| 設定1 |
- |
1/2048.00 |
1/10922.7 |
| 設定2 |
1/1560.38 |
| 設定3 |
1/2048.00 |
| 設定4 |
1/1424.70 |
| 設定5 |
1/1820.44 |
| 設定6 |
1/1170.29 |
+ ボーナス同時抽選
| |
|
|
|
| 設定1 |
- |
- |
1/2184.5 |
| 設定2 |
| 設定3 |
| 設定4 |
| 設定5 |
| 設定6 |
+ ボーナス同時抽選
| |
|
|
|
| 設定1 |
1/4369.1 |
1/4369.1 |
- |
| 設定2 |
| 設定3 |
| 設定4 |
| 設定5 |
| 設定6 |
+ ボーナス同時抽選
| |
|
|
|
| 設定1 |
1/2184.5 |
- |
- |
| 設定2 |
| 設定3 |
| 設定4 |
| 設定5 |
| 設定6 |
同時抽選小役別 ボーナス成立確率
| |
|
// |
| 設定1 |
1/21.1 |
1/53.3 |
| 設定2 |
1/16.7 |
| 設定3 |
1/21.1 |
| 設定4 |
1/15.4 |
| 設定5 |
1/19.0 |
| 設定6 |
1/12.9 |
|
| ボンバータイム(BT) |
|
ボンバーマンビクトリーにはボンバータイムというRTが搭載されており、全てのボーナスの後、必ず突入し、リプレイ確率が1/1.3(通常時の約5.6倍)にアップする。
最長3000G間継続し、ボーナスの成立かボム入賞で終了する。
ボムは入賞が条件な為、成立してもリール上に止まらなければ3000G間継続する。
ボーナス中に獲得したポイントがBT中のステップナビ(SN)回数になるので、ステップナビ回数が残っている限り、ボム成立時にステップナビが発生する為、ボムをはずすことが可能になる。(ボム以外の小役成立でステップナビが発生した場合、残りステップナビ回数を消費しない)
ステップナビの残り回数が0回の場合は、バロム(ドット)演出や、最後までボムの種類を絞り込めないステップナビが発生するので自力で成立しているボムの種類を予想してはずさなければならない。
極稀にステップナビ回数が残っているにも関わらずボム成立時にバロム(ドット)演出や3択ステップナビが発生する場合があるのでその時は自分自身のシックスセンスで乗り切ってもらいたい。
|
BT 突入・終了条件
| 突入条件 |
終了条件 |
●BIG消化後
●REG消化後 |
●BIG成立
●REG成立
●ボム入賞
●3000G消化 |
BT中 ボム成立時に選択されやすい演出
| 残りSN
1回以上 |
残りSN
0回 |
 |
 |
| ステップナビ |
バロム(ドット)出現or3択ステップナビ |
|
| ステップナビ(SN) |
ステップナビ(SN)とはリールサイドにある6つのキャラクターランプ(各小役対応)で小役をナビしてくれるシステムでレバーON時に6つのランプが点等し、ボタンを押す度に成立していない小役が消灯していき、最終的に点灯し続けたランプで小役をナビするというもの。
ステップナビの大半はボム成立時に発生するのだが、ボム入賞は左リール限定な為、ステップナビ発生時に左リールを最後に止めることによってボムの種類を見極めることがステップナビの打ち方になる。
また、第二停止時に中・右リールで「スイカ」「ベル」「リプレイ」を否定しているにもかかわらずランプがボムの種類をしぼりこめていない場合(左ランプ全点灯)は3種類あるボムをカンで当てるしかない。
ボーナス中に獲得したポイントはステップナビ回数として一旦ストックされ、その後のボンバータイム中にステップナビが発生する度に消費していく。
ボンバータイム中にステップナビ回数がまだ残っているにもかかわらずボムを入賞させてしまった場合は、残りのステップナビは次回のボンバータイムに持ち越される。
ステップナビ回数のストックがある場合にボム以外の小役が成立しているステップナビや通常時(否BT中)に発生したステップナビはストックしているステップナビ回数を消費しない。
つまり「ストックステップナビ回数=ボンバータイム中にボムをナビするステップナビ回数」ということである。 |
ステップナビ説明
| 1.レバーON |
|
| レバーONにリール横にある6つのキャラクターランプが点灯する |
| |
| 2.第1停止 |
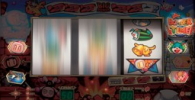 |
| ボタンを1つ停止すると左右のランプがそれぞれ1つずつ消灯する |
| |
| 3.第2停止 |
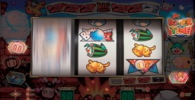 |
次のボタン停止でさらに1つずつキャラクターが消灯し、残った2つのキャラクターのいずれかの役が成立している
この画像では白ボムorリプレイがナビされているがリールでリプレイが否定されているので白ボム成立が確定する |
| つまり、ボンバータイム中のステップナビ発生時は変則押しをすることによって、左リールを最終停止にすることで成立役をしぼりこみ成立したボムを避けようというのがステップナビの活用方法である。 |
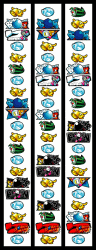
キャラクターランプ 対応役
ステップナビ発生時 消化手順
最初に狙う絵柄
中リール枠上〜中段に を を
目押し後、停止型にあわせて右狙い
| 停止パターン |
対応役 |
左にナビされた
ボムを避けて止める |
|
|
|
|
|
|
|
適
当 |
|
適
当 |
|
| |
|
|
|
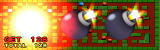
| BIG中のミニゲーム |
BIG中にはミニゲームが用意されている。このミニゲーム中に獲得したポイントがステップナビの回数になる為、他の5号機によくある退屈しのぎのミニゲームとは違いボンバーマンビクトリーでは大変重要な役割を担う。
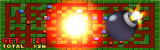
ゲームといってもテクニックは必要とせず、BIG中ベルが成立したプレイに発生する場合があり、液晶上に出現する3つの爆弾の押し順を当て、正解すると爆弾が爆発するというものである。
「赤7・赤7・白7」のBIGの場合、爆弾3つともの押し順を正解しなければならない為6択となるが、「赤7・赤7・赤7」のBIGの場合は始めに押すボタンを正解させればいいだけの3択になる。
「赤7・赤7・赤7」BIGの場合、押し順をナビしてくれる金色の爆弾が出現する場合もある。
押し順を正解した時に獲得できるポイントは高設定ほど多くのポイントを獲得できる可能性が高くなっている。
また、REG中にはミニゲームが存在しないが5回〜50回のステップナビが必ず獲得できる。
そしてBIG中すべてベルだった場合にはボーナスとして最低10回、最高100回のステップナビが上乗せされる。 |
中 ミニゲーム
(第1停止を当てる3択)
 |
ジ |
 |
出現する3つの爆弾から
第一停止を当てればOK |
|
金色爆弾が出現すると
押し順をナビしてくれる |
|
中
ミニゲーム発生率
| |
通常時BIG |
BT中BIG |
| 設定1 |
1/4.90 |
1/4.32 |
| 設定2 |
| 設定3 |
1/4.65 |
1/4.20 |
| 設定4 |
| 設定5 |
1/4.43 |
1/4.02 |
| 設定6 |
1/3.95 |
|
金ボム発生率
| |
通常時・BT中 |
| 設定1 |
1/85.33 |
| 設定2 |
| 設定3 |
1/72.82 |
| 設定4 |
| 設定5 |
1/65.60 |
| 設定6 |
|
中 ミニゲーム
(全ての押し順を当てる6択)
 |
ジ |
 |
出現する3つの爆弾から
第一停止をまず当てた後 |
|
残った2つの爆弾から
残りの押し順を当てる |
|
中 ミニゲーム発生率
| |
通常時BIG |
BT中BIG |
| 設定1 |
1/4.96 |
1/3.12 |
| 設定2 |
| 設定3 |
1/4.75 |
1/2.95 |
| 設定4 |
1/4.55 |
1/2.87 |
| 設定5 |
1/4.37 |
1/2.73 |
| 設定6 |
1/2.48 |
正解時 爆発パターン演出
| |
+1P |
+3P |
+5P |
| 通常 |
82.16% |
34.85% |
23.24% |
| 第1&第3 |
16.60% |
49.79% |
26.97% |
| 第3停止 |
1.24% |
15.35% |
49.79% |
設定別 ステップナビ回数振分率
ミニゲーム正解時 SN回数振分率
| |
+1 |
+3 |
+5 |
| 設定1 |
89.6% |
8.0% |
2.4% |
| 設定2 |
88.8% |
9.6% |
1.6% |
| 設定3 |
86.4% |
9.6% |
4.0% |
| 設定4 |
86.4% |
12.8% |
0.8% |
| 設定5 |
73.7% |
21.5% |
4.8% |
| 設定6 |
68.1% |
25.5% |
6.4% |
押し順以外でのステップナビ回数獲得
BIG中
全てベル
| |
振分率 |
| +10回 |
2.79% |
| +15回 |
32.67% |
| +20回 |
51.00% |
| +50回 |
12.75% |
| +100回 |
0.80% |
|
REG後
| |
振分率 |
| +10回 |
93.63% |
| +15回 |
3.19% |
| +20回 |
1.59% |
| +50回 |
0.80% |
| +100回 |
0.80% |
|
|
| 演出 |
全4ステージ
通常時の3ステージ+BT専用ステージの全4ステージで構成されており、古代遺跡ステージがBT専用ステージとなる。
 |
|
 |
| 空ステージ |
|
海ステージ |
| |
ジ |
|
 |
|
 |
| 地下ステージ |
|
古代遺跡ステージ |
|
■WARNING演出■
通常ステージで起こる演出。
各ステージ毎に違った危険がボンバーマンを襲い、見事回避できればボーナス確定。
クジラから逃げる演出ではクジラの色が白いと期待度アップ。
 ジ ジ |
■ルーレット演出■
通常ステージでルーレットに突入すればチャンス。
見事ルーレットが「3」か「7」で停止すればボーナス確定。
ただ「7」が停止した場合でもBIG確定とは限らない。
海ステージのルーレットでは金のイルカ出現で期待度アップ。
 ジ ジ |
■黒ボンバトル演出■
ライバル黒ボンとの対決演出。
白ボンの投げる爆弾の大きさや、黒ボンの操縦するロボットの大きさで期待度が変化し、見事バトルに勝利すればボーナス確定。
敵のロボットが弱々しかったり、サイドランプが紫になれば期待度アップ。
 ジ ジ |
■黒ボン対決演出■
各ステージで直接黒ボンとの対決を行う。
見事黒ボンに勝利すればボーナス。
 ジ ジ |
■ボスバトル演出■
各ステージ毎のボスとのバトル演出。
対戦開始時のBETボタンでサイドランプが紫に光れば期待度アップ。
もちろん対戦に勝利すればボーナス。
白ボン攻撃時に爆弾を3つ投げると期待度が上がり、デカ爆弾を投げるとさらに期待度がアップする。
 ジ ジ |
■パネル告知演出■
各ステージにそれぞれの小役に対応したパネルが出現する。
パネルには対応役があり、対応役がはずれたりボンバーマンパネルや1UPパネルゲットでボーナス確定。
 ジ ジ
パネル別 対応役
|
|
ボーナス成立後のリプレイ
ボーナス成立後はリプレイ確率が1/2.6にアップするので、同時抽選役を引いた時やバトルに発展した時などにリプレイが連続して成立するようならばボーナスの期待度がアップする事になる為、その点にも注意しながら打ってほしい。 |
|
| 通常時&BIG中の打ち方 |
通常時の打ち方
通常時にDDTを行うことによりチャンス目の察知やスイカの取りこぼしを防ぐことができるのでぜひ実行したい。
チャンス目はボムの取りこぼしやボーナス成立時に出現する。
ベルに設定差が設けられている為、高設定ほどコイン持ちがよくなっている。 |
■順押しDDT■
最初に狙う絵柄
 |
枠上 |
|
回
転
中 |
回
転
中 |
| |
| |
左リール枠上〜上段にを目押し
DDT時チャンス目出現例
| |
ハ
ズ
レ |
|
| |
|
|
|
|
| 下段中リールベルはずれ |
■成立ボーナス判別■
最初に狙う絵柄
|
枠上 |
| |
回
転
中 |
回
転
中 |
| |
| |
左リール枠上にをビタ押しした後、
上段に停止時は右リール中下段に を目押し を目押し
BIG中の打ち方
BIG中は筐体上部両サイドにあるサイドランプで成立した小役をナビしてくれる。
ベル以外の小役成立じには予告音も発生する。
BIG中はスイカorボムを1回だけ揃えあとはベル以外全てはずすのがベスト手順となる。
小役をはずすと獲得枚数は減少するが、その分ゲーム数を多く消化できる為、ミニゲーム発生回数を増やしSN回数を稼ぐことで全体的な出玉を確保するのが狙いだ。

サイドランプで小役をナビ |
|
|
| ボンバーマンビクトリー
関連商品 |
| |

T O H O M E |